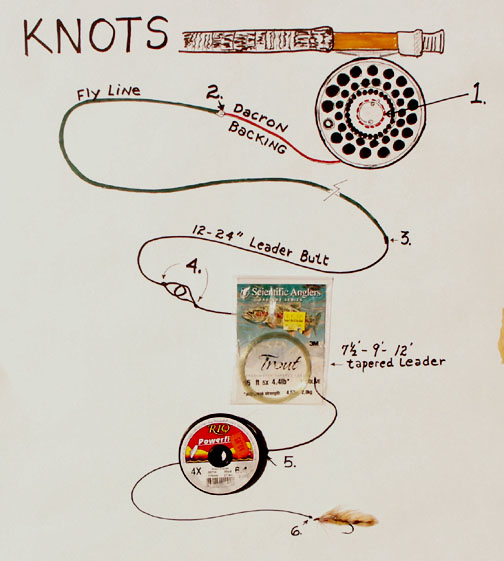
Leaders and Necessary Knots
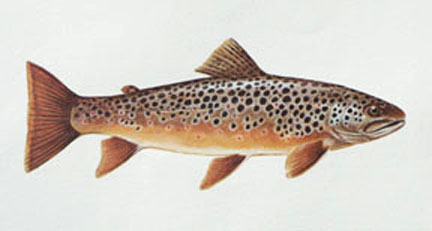
Brown Trout
This instructional guide is not meant to be the definitive guide to fly fishing. Many different knots exist for specific applications. I have covered only necessary knots to prepare the beginner for his or her first trek. However, it is also true that the knots covered below will suffice for the majority of your fly fishing needs. L.L Bean's Ultimate Book of Fly Fishing provides an excellent resource to knots, as do many other fine primers. If you bought a double tapered fly line, I would suggest tying on a leader butt at both ends. Having done this, you may now easily tie the braided backing directly to the perfection loop. When it comes time to reverse the line due to wear, a reversal of the line may be done in a matter of minutes.
Leaders
Leaders are made of semi-transparent monofilament nylon, and they are tapered from the butt section all the way down to the tippet, which attaches to the fly. The importance of the leader is twofold; it serves to cast the fly in a tight loop because of the tapered design, and it keeps the fly away from the fly line, which under most circumstances will spook a fish. The tapered diameter also makes it easy to thread the tippet through the eye of the fly.
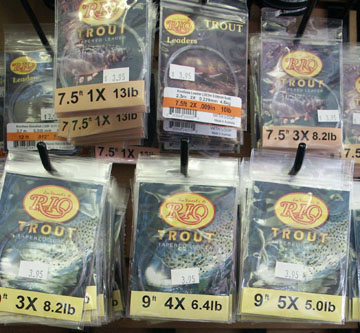
Leaders are hand tied into graduated sections, or they are manufactured knotless. If you buy a knotless leader, always give an experimental tug on the tippet. The tapered design is basically achieved through an acid process, and many times the entire tippet will break off with the slightest pull. Better to repair the leader on the spot than loose a good fish because of a weak spot in the leader. It wasn't many years ago that the cost of a tapered, knotless leader was so economical that the time spent building one seemed hardly worthwhile. However, with increased prices, tying your own leaders is both economical and advantageous. You have the opportunity to tie a variety of leader formulas for all occasions rather than butchering up a nine foot 4X leader for a heavy Woolly Bugger.
Generally speaking, a 4X (.007) tippet will serve you well under most trout fishing situations. For larger hopper patterns or salmon flies, you will need a larger diameter such as 2X or 3X. The primary reason for this is that a lighter tippet will not turn the fly over properly, and if the tippet is too small in diameter, the fly will jerk around which will cause abrasive weakening in the knot. The diameter is important as it will determine the measure of visibility and breaking strength. Regarding the length of the leader, I would recommend the following. Use a 4X, 7.5' leader on creeks and streams. When I am working with a child on a small creek, I sometimes cut the leader down to five feet. Use a 4X, 9' leader on moderately flowing streams. Use a 5X or 6X leader, 9'-12' on spring creeks or slow, flat stretches of water where trout can lazily rise to inspect your offering.
3X tippet, size 6-10 fly approximately 5 lb. test
4X tippet size 12-18 fly approximately 4lb. test
6X tippet size 20-22 fly approximately 2 lb. test
Making Your Own Leaders: Use a four foot pine board. Write down the
leader formula of your choice on the board. Use two finish nails to
hold each spool. Start with the butt section and work down to the
tippet. A basic formula is 40% butt section, 40% midsection and 20%
tippet. Be sure to cut off an additional two inches at each end of the
individual piece in order to tie the blood knot. The distance below
represents the distance from knot to knot.
Inches: 3x 4x 5x
25 .022 .022 .022
18 .020 .020 .020
11 .017 .017 .017
11 .013 .013 .013
11 .012 .010 .010
11 .010 .008 .009
(10 inch piece)
18 .008 .007 .007
(10 inch piece)
.005
(18 inch piece)
Important Knots / Set Up My illustrations are good enough to provide the basic concepts and steps. However, better steps and illustrations can be found on the web. One that I thought was very impressive is Killroys.
Knot 1: Duncan Loop Knot: Tying Backing to the Reel
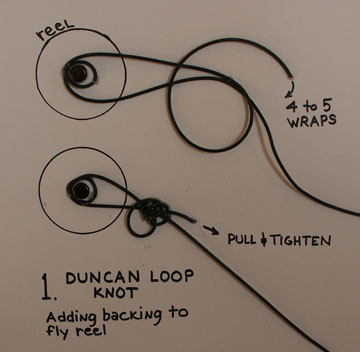
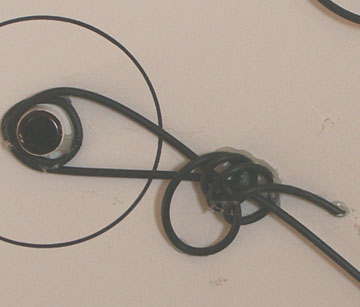
Steps:
1. Wrap the backing around the reel spool spindle twice. Provide at least 7 to 10 inches of line past the reel for wrapping.
2. Lay a large loop across and over the two lines exiting the reel. This loop will now be wrapped. Hold and pinch the lines. Simply wrap the tag end over the two top lines threading it through the loop up and across the two lines again. Wrap four to five wraps as depicted in the photograph above.
3. This wrapped loop now needs to be pulled tight and secured against the spindle in the reel. Pull the taq end of the line to cinch. Once the knot is secure, trim any excess trailer. Alternate pulling each line until the line is cinched tightly against the reel spool spindle.
Knot 2: Tying Backing to a Fly Line

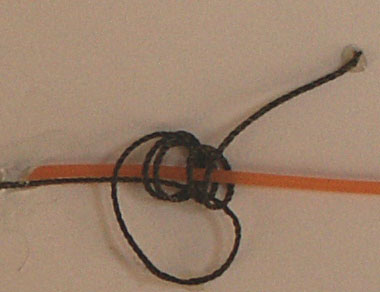
Steps:
1. This is the same Duncan Loop Knot. Form a two-inch loop by pulling
the backing parallel to the line and then forming a 4 to 6-inch loop by
crossing the line over itself and the fly line. This tag line will now
be used to wrap the sagging loop beneath the fly line five or six times.
2. Make five or six wraps over the fly line and through the sagging line. Cross over the fly line for additional wraps.
3. Keep the wraps from overlapping each other. Carefully pull the wrapping end of the backing to snug up the wraps against the fly line. You may have to use a fingernail to keep the wraps snug against each other without overlapping.
4. Once the wraps are in place, pull both lines until the knot is
firm and snug against the fly line. Trim the excess fly line and back,
and add a drop of a flexible bonding cement. Your reel now has backing
and an attached fly line. Now it is time to add a leader butt to the
delivery end of your fly line.
.
The Leader Butt
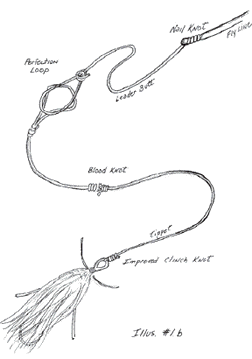
The leader butt should be from twelve to sixteen inches and made from 25-35 pound monofilament. The knot which attaches the leader butt to the fly line is called a nail knot or a tube knot, as the nail or small plastic tube is essential in making this knot. Some of the commercial leader manufacturers provide the small tube for tying a leader directly to the line. You may do this for your first leader. After it is worn out, cut off everything but sixteen inches. Add the perfection loop on the end and you now have a leader butt for your next leader add on. The general rule of thumb is that the monofilament should be two-thirds the diameter of the fly line. If you are working with a youngster, skip this knot and go directly to the Perfection Loop Knot. The leader butt is a one time addition for a new line.
Nail Knot
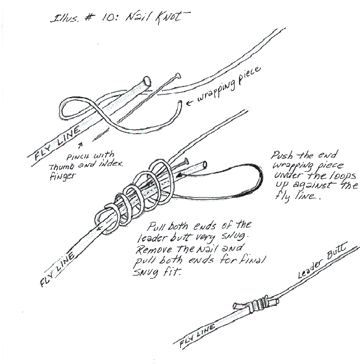
The nail knot is used to attach a leader butt to the fly line. After
the knot is tied, coat the knot with a rubber based glue such as
Pliobond which will give the knot a smooth surface. The smoothness
allows it to glide through the guides on the rod. If you use a thin
nail, cut the monofilament at an angle as a sharp point will thread its
way under the wraps a whole lot easier than a blunt tip. Be sure to
give yourself plenty of monofilament to work with as the final step in
this knot is maddening if you come up short.
Perfection Loop Knot

It was not too long ago that leader manufacturers included a perfection
loop on their leaders. All you had to do was thread the leader loop
through the leader butt loop. The two loops should slide back and forth
after you pull the tippet through. The advantage of changing leaders
quickly more than makes up for an occasional tipped over fly. A more
popular method is to tie the leader to the leader butt with a blood
knot.
Blood Knot
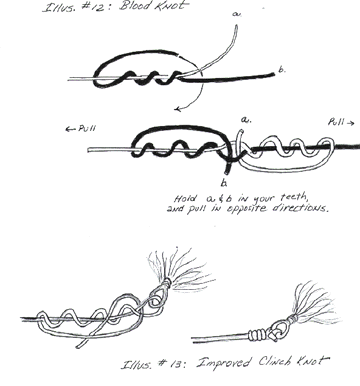
A Blood Knot is used for joining leader material or adding a new section of tippet to the leader. The trick in successfully tying a blood knot is to be sure that after wrapping line A, you lay it in the V wedge you created and hold it firmly with your thumb and forefinger while you wrap line B. (Wrap line A and B five or six times.)
When you have finished wrapping line B around line A, you need to run the tag end of line B through the center hole you created, which is kept open with line A. Be sure to come through the hole from the opposite direction of line A, as when you pull the two lines in opposite directions, the left over pieces should be opposite each other. The easiest way I have found to pull this knot together is to hold the two short pieces between your teeth, wet the wraps with your tongue and pull evenly in opposite directions. The next knot you will need to learn is the improved clinch knot which attaches the fly to the leader tippet.
Improved Clinch Knot (See illustration above.)
This is a simple knot to tie your fly to the tippet. Do not work with so much tippet that you end up cutting off excessive tippet. If you do this too often, you will be tying another tippet section to your leader. Quite often I watch as beginning fly fishers laboriously wrap thinly tapered tippet one wrap at a time. You will find it much easier to thread the tippet through the eye of the hook, allow a couple of inches to lie up alongside of the leader and spin the fly to achieve five or six wraps. Now, run the short end piece through the large loop or opening you just created. Place the small left over piece between your teeth and cinch the wraps snug up against the eye of the hook. Dress your fly with floatant and cast over next to that log for that big brown!
Droppers and Trailers
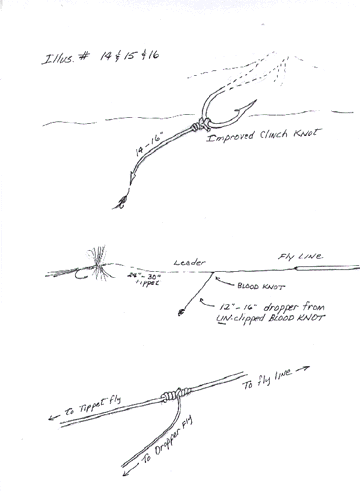
How-to-books on fly fishing go back to the 1400's. Fishing with multiple fly offerings is nothing new. John Merwin in his book Fly Fishing notes that 150 years ago droppers were in favor in Walton's first American edition. Quiet often on those slow days of summer, you will be torn between fishing a nymph or continuing to fish with a dry fly. Some days you will want to do both. The simplest technique is to tie another short tippet right on the bend of the hook with an improved clinch knot. I recommend that you add on 12 to 16 inches of tippet of a smaller diameter if you plan on fishing a smaller dry fly behind a larger dry fly. If you tie on a nymph, stay with the same diameter tippet. This system works very well with large Stimulators and hoppers.
During a baetis or trico hatch, when the light is poor or I have to make a long cast, I tie on a #18 Parachute Adams trailed by a #22 trico spinner. If I see a sipping fish within a foot of the upright parachute, I set the hook. Most of the guides I worked with use a Hare's Ear Nymph, a bead-eye Prince or some other nymph as a trailer right off the bend of the larger dry fly, which is referred to as an in-line dropper. A couple of seasons ago I learned of one guide who had a successful spring day fishing Woolly Buggers with a light weight nymph tied out from the Woolly. A traditional set up fishing two or three wet flies utilized a hand tied leader. Instead of snipping off the excess tip on the blood knot, extra leader was tied into the blood knot so that one piece would stick out 6-8 inches which you would attach a smaller fly. At the tippet end, you would tie on the heaviest fly. Regardless of where you add the dropper, be mindful of the depth that you think fish are feeding in below. Probably the most popular dropper is the Hopper Dropper for late summer.

Leave a comment